No Bake Strawberry White Chocolate Cheesecake
Creamy no bake cheesecake made with white chocolate, layered with fresh strawberries, housed in a cookie nut crust.
Servings 1 9 inch cheesecake
Equipment
- 1 9 inch springform pan
Ingredients
Crust
- 300g graham cookie or digestive biscuit crumbs
- 100g walnuts or pecans ground into bits (if you need to leave the nuts out, increase the crumbs to 350g and reduce the powdered sugar to 2 tablespoons)
- 40g or or ¼ cup powdered sugar
- 113g or 8 tablespoons butter melted
Filling
- 453g or 2 bricks full fat cream cheese at room temperature
- 120g or ½ cup labneh or sour cream
- 40g about ⅓ cup powdered sugar preferably made with tapioca starch
- 1 tablespoon vanilla paste or extract
- ½ teaspoon fine sea salt
- 200g white chocolate melted (the chocolate should have the ingredient cocoa butter listed)
- 300g or a little over 1 cup heavy cream or heavy whipping cream
- 1 tablespoon lemon juice freshly squeezed
- About a quart of strawberries sliced thin
Instructions
- Please note: this is a no bake cheesecake because the filling does not have eggs and is not baked. We will however be baking the crust so that it sets and is easily sliced - it also improves flavor. You have the option to skip this if you don’t mind a more crumbly crust.
Make the crust
- Preheat the oven to 350 F. Lay a sheet of parchment over the bottom of a 9 or 10 inch springform pan and clip the ring over it. Trim the parchment if you like so there’s not a lot of overhang.
- Place the cookies in the food processor and run it on high until the cookie crumbs are finely ground. For the nuts, especially if using walnuts, grind and stop as soon as they are in bits - if you continue to grind they will turn into a paste.
- Melt the butter and add it, the cookie crumbs, ground nuts, and powdered sugar to a large bowl. Stir with a spoon or mix by hand until the butter is incorporated and there’s no large bits of butter or too dry bits of crumbs - check by squeezing the mix with your hand, it should kind of hold shape.
- Press half of the crumbs into the bottom of the pan and the other half up the sides. Use a measuring cup to help you flatten and pack the crumbs into an even layer. Bake the crust for 10 minutes until fragrant. If it’s gone a bit misshapen out of the oven, use the measuring cup to press it back. Let cool completely.
Make the filling
- Place the cream cheese into a stand mixer bowl. Use a wooden spoon or rubber spatula to press it against the bowl. Affix the paddle attachment and turn the mixer on medium low, beat until smooth.
- Add the sour cream or labneh, salt, vanilla, and powdered sugar and beat until smooth (medium to medium low speed).
- Chop the white chocolate into chunks and melt in the microwave in 30 second increments, stirring in between. Alternatively melt over a bain marie. Pour the chocolate into the cream cheese mixture and beat until smooth, just a minute or two.
- Pour the heavy cream and lemon juice into the bowl and switch the mixer to the whisk attachment. Whisk on medium to medium high until thickened, the whisk should leave ripples that hold shape in the bowl.
Assemble
- Slice about two thirds of the strawberries thinly (the rest we’ll use for the topping).
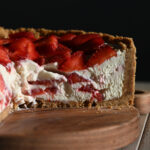
- Pour a third of the filling into the cooled crust, smooth into an even layer. Arrange a layer of sliced strawberries over the filling. Repeat with another third of the filling and another third of the sliced berries. Pour the remaining cheesecake batter filling over the top and smooth into an even layer, set in the fridge to chill for 6 hours. You can add the rest of the strawberries now but they tend to look a bit unattractive and soft after 6 hours in the fridge so I prefer to add the last berries before serving. Once set, the cheesecake will slice easily with some berries shifting in and out as the knife goes through. Cheesecake is best the day of, once the berries have been on top. Though if you don’t mind the softer berries, the next day it’s great too!