Homemade Pie Crust
Basic, all butter homemade pie crust recipe. Plus, step-by-step photos, a video and a section on how to blind bake pie crust. Everything you need to make the best pie crust.

Let’s start with an obvious question: Why not just buy pie crust?
Two reasons: flavor and control. The latter leads to the former.
Control: Most store bought pie crust has preservatives and probably more sugar or salt than you’d like. Some don’t even use real butter and instead use oil. If you make your own, you get to use the butter you like, flavor it the way you like and more or less sugar and salt.
Which all in itself means, it’s going to have much better flavor.
Also – store bought pastry is usually quite flat. You aren’t going to get those infinite flaky layers that make homemade pie crust so deliciously wonderful.
Recipe Origins
I was asked for it a few times and I’m sharing this so I have a page I can refer you to, full of detailed instructions and tons of information and tips, when you’re making a recipe of mine that requires pie crust.
Pie crust is notoriously difficult to get right. Either it loses shape, melts and falls off the pan, shrinks, doesn’t fully bake (and then there’s raw dough at the bottom of your precious baked pie, ugh!) or butter starts leaking… and now the smoke alarm is blaring and the oven’s a mess and you wished you’d just saved yourself the fuss and bought some from the store.
Every single one of these things has happened to me and sometimes still does. Easy as pie is the biggest lie I’ve ever heard. So I’ve set off to make my own guide so that I don’t mess it up.
The raw basics of this crust recipe are adapted from Ovenly’s pie recipe, it’s a very simple pie crust recipe and always, always gives me exactly the classic, flaky pie crust. But over the years I’ve found how to swap out ingredients (and when not to), how to flavor it (and when not to) and a method for making it simply, knowing what flours and butters will require more water and which ones require less. Yes, brands can matter (because brands usually mean a difference in the product).
How to make an all butter homemade pie crust
Whisk the dry ingredients together

Slice in the butter: either with a knife or with the slicer side of a cheese grater

Rub/cut the butter into the flour either with your fingers (easier if you’ve used the cheese grater because the butter slices will be thinner) or with a pastry knife


Add the water, and the vanilla

Gently stir it with a spatula

Then switch to using your hands, folding the dough over itself and gently squeezing to get it to come together in a ball

Out of the bowl, gather it into two disks

If you like flaky layers, pat each ball of dough into a disk, slice it into quarters, then stack it and


Shape it back into a disk, wrap it in plastic wrap then use a rolling pin to flatten it

Set in the fridge to chill for at least four hours.
Best Homemade Pie Crust Tips
Everything needs to be cold. Like really cold. This is why I’ll instruct you to add ice to the water and to further chill the butter before using.
Don’t add too much water. It should look dry as it’s coming together. There will be flour and bits of dough that fall off the round you’ve shaped and that’s ok. In fact, it’s good.
Chill your pie crust before rolling it out and before baking it.
You probably already know that the flour needs to hydrate before you can roll it out, so you know that once you’ve made it, brought it together and wrapped it in plastic wrap it needs to sit in the fridge for at least 2 hours. You can also make it up to 2 days ahead of time.
However, did you know you should also chill the pie after shaping it into the pan and before baking? I learned this from The Book on Pie, and now I stick mine in the freezer for at least 30 minutes, even if I am just making a galette (in a galette’s case I do this after I’ve added the fruit and shaped it but before I’ve done the egg wash).
Chilling the crust after shaping and before baking keeps the butter nice and cold but also, especially for pies that we want to have a pretty trim, helps it keep shape.
Tips for Rolling Out a Pie Crust
- Generously flour the counter top, the rolling pin and the top of the pie crust.
- When the dough is very cold (like if it’s been in the fridge overnight), it’s nearly impossible to roll out. Give it 10 minutes on the counter at room temperature and, this is quite fun, take the floured rolling pin and bang it to flatten it. This will help you roll.
- Roll out the dough to about 2 inches wider than your pie pan (so 11 inches if you are using a 9” pan).
- When rolling, make sure you’re doing it evenly – you don’t want thin/thick spots as they will bake unevenly.
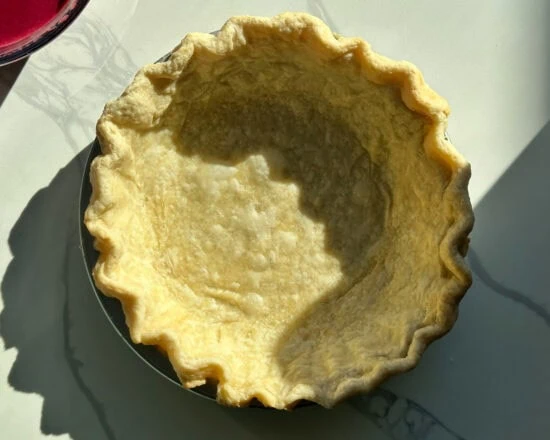
Shaping a homemade pie crust
Transfer the dough to the pie pan (you can do this by gently wrapping it around the rolling pin) and gently press it into the bottom edges of the pan.

Trim any excess crust so you have an even circle around, there should be enough around it for you to fold it over and have about ½ inch rim.
Crimp the crust, either by pressing your index fingertip on one hand between your index and thumb fingers on your other, or (for a larger crimp) use your knuckle.

Chilling the dough
The dough needs to chill (i.e. rest) twice: once after you make it and once after you shape it into the pan. Set it in the fridge uncovered for about an hour. When it’s time to bake it, the dough should be very solid. Preheat the oven to 375 F.
Cover the entire crust with foil, gently wrapping it around the edges to keep those crimps in place. Make sure to layer in the foil like a sling, so you can lift it out with the beans at the end of the first bake. Fill it with pie weights all the way to the rim (I use dried beans).
How to blind bake a pie crust
Preheat the oven to 375 F.
A Full Blind Bake
For pies that have an unbaked filling, like a pudding.
Bake the pie covered with foil and pie weights for 30 minutes. Then, remove the weights and the foil and dock the bottom with a fork. Brush egg wash over the edges and sprinkle sugar if you like, lower the heat to 350 F and return it to the oven for another 20-25 minutes, until golden all over.
A Partial Blind Bake
You’ll do the first step as listed above (covered, weighed down for 30 minutes at 375) but the remaining bake time will depend on your filling:
For a curd that will need about 10-15 minutes in the oven: you’ll want to bake the pie a bit more uncovered before the filling goes in, about 10-15 minutes. Then fill and bake for as long as the curd needs to set (usually curds bake for about 12-20 minutes at 350 F).
For a custard (like pumpkin pie) that will need about 30-40 minutes in the oven: you can do 10 minutes at 350 uncovered if you want a really crispy bottom but if not, add the filling then bake as directed.
For other fillings, things to keep in mind: however long the filling needs to bake & the temperature it will bake at are going to affect the crust. Do the calculation bearing in mind the crust will cook slower than the filling, given that it’s under it.
Remember: A pie crust will ALWAYS shrink a little. That’s ok!
FAQ
Can I make a chocolate or cocoa pie crust?
Yes, use this recipe.
How can I flavor a homemade pie crust?
You’ll notice my recipe below calls for lemon zest, this is great for berry pies and anything that complements a lemon flavor. Orange and lime zest are great too.
But also, extracts. Vanilla is an always – it goes well with any kind of fruit or chocolate or custard pie. You could also use a lemon extract (use a good quality one). And if you are making my cocoa pie crust, a peppermint extract would be lovely if you wanted a chocolate mint flavor.
What kind of flour is best for homemade pie crust?
A standard protein content of 10.5-11.7% is perfect. If you get to 12, this is more of a bread flour and anything lower than 10.5 is usually a cake flour.
Which means, if you needed to you could use a blend cake and bread flour two to make a medium protein content.
What kind of butter is best for homemade pie crust?
Some people will say European butter, with its higher butterfat content, is better for any pastry. I think it’s great in brioche (and even cookies, duh) but I personally think that because it tends to melt quicker, it isn’t always ideal for pie crust or something that you’ll be using your hands to work with and need to keep cold so you get those flaky layers.
How best to store homemade pie crust and how long does it keep for?
Wrap it tightly in plastic wrap. Store in the fridge for up to 2 days or in the freezer for months
What tool is best for cutting butter into dough for pie crust?
I use a pastry cutter. I have heard of people using butter knives or forks, it could work but seems like it would be rather laborious. Some people use their hands, when I do this I chop up the butter with a knife first. Only do it if your hands aren’t too warm and melt the butter.
What pan is best to bake pie crust?
Metal with a wide rim, to hold up your trim. I do not like using glass or ceramic, both of these heat slower and retain heat longer. Metal will heat up fast and cool down as soon as it’s out of the oven. This is my favorite one to use.

Homemade Pie Crust Recipe
Homemade Basic Pie Crust
Ingredients
Ingredients for a double pie crust
- 325g all purpose flour
- 30g granulated sugar
- ¾ tsp fine sea salt
- Zest of 1 lemon optional, ideal for fruit pies
- 226g butter cold and unsalted (2 sticks)
- 80g cold water
- 1 tsp pure vanilla extract or vanilla bean paste
Method
- Before you begin, put the butter in the freezer and set some water in a bowl with a couple of ice cubes.
- In a large bowl, whisk together the flour, sugar and salt. Zest the lemon, if using, into the bowl and whisk.
- Cut the butter into thin slices, I like to do this with the slicer side of a cheese grater, and add it to the flour, briefly mix it with a spoon or your fingers to cover the butter with flour.
- If you used the slicer, now use your fingers to rub the butter into the flour until the butter is in about kidney bean-sized pats. If you used a knife your butter chunks are probably larger, use a pastry knife to help you cut in the butter.
- Add the water from the iced water prepared earlier, drizzling it all around, and, if using, add the vanilla into a spot where there’s some water. Use a rubber spatula to stir it together.
- Use your hands to bring the dough together by grabbing it and folding it over itself, then pressing down giving it a gentle squeeze , over and over until the dough comes together into a shaggy ball.
- If you like layers, set the pie crust on a floured counter and press it out into a flat disk. Slice it into quarters then stack the quarters and press it down again into a disk. Wrap it in plastic wrap, use a rolling pin to flatten it into an even layer and roll the edges on the counter like a wheel to smooth them over.
- Chill for 2 hours or up to 2 days. See above “how to bake a pie crust” for baking times and how to.
Notes
To make enough for just the bottom crust or a 9 inch round galette, halve the recipe.
Did you make this recipe?
Share & tag me on instagram @buttermilkbysam


For some reason my dough wasn’t coming together and I had to add a few extra tablespoons of water (weighed the ingredients and everything) ..crossing my fingers it turns out! making your lemon meringue pie tomorrow 🙂
Simple, delicious pie crust that came together in minutes. I made it savory, halving the sugar and mixing the vanilla, to encase a smoked turkey pot pie. I can’t wait to try it sweet as well. Instructions were clear and easy to follow!
Easy to follow and so flaky and tasty! Thank you for sharing Sam! Your recipes never disappoint!
This is my go to pie crust! It’s super easy to adapt, never fails me, and has tons of delicious flavors! I’ve tested quite a few pie crusts, and this one always ends up my favorite.
OH! Your comment made me so happy – I’m thrilled you love it too 😀