Enriched Marble Bread
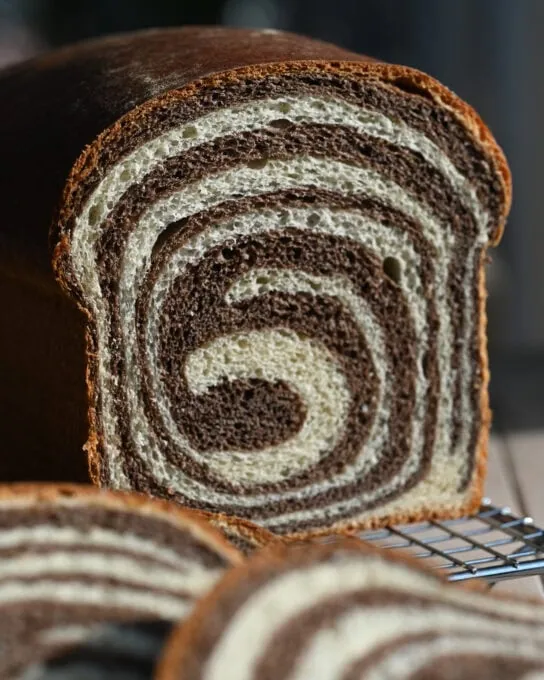
Make a basic butter and milk enriched dough and separate into two: one half will be flavored and colored with cocoa, the other left plain. Layered and swirled together this produces an eye catching swirled loaf.

Recipe updated September 2026: the recipe now makes one large swirled loaf and has been updated to include butter and milk powder, giving it a richer flavor.
Earlier this year, I saw a lovely two-toned dough in this pic on instagram and a few weeks later an ube version on this site . I started to picture a chocolatey dough swirl within an enriched plain dough. I knew that keeping a plain dough and adding some darker cocoa would give me a very pretty contrast. Happily, the cocoa does come through in taste too! This isn’t an overly sweet bread, think of it like a light brioche with a hint of cocoa.
The recipe requires you to make two small separate doughs, allow them to rise separately and then roll each out and fold them together for a second rise. Honestly, it’s super easy and totally worth the extra dough-making. It’s not a very sweet bread, making it great for breakfast.

Recipe Ingredients
Flour: use a high protein all purpose flour or a bread flour.
Water: we’ll use some to make the tangzhong and some to bloom the yeast. You’ll also add some to the cocoa dough.
Milk: to make the tangzhong.
Yeast: I use a packet of instant yeast (fast acting) but active dry will work too. Measure out a little over two teaspoons.
Sugar: fine granulated. Removing or reducing the sugar will make for a drier bread.
Eggs: large eggs.
Buttermilk or milk powder (non-fat or not): this enriches the bread’s flavor and makes it softer. Ideally you don’t skip this.
Salt: fine sea salt. Halve the amount if using table salt.
Butter: softened and unsalted. It must be at room temperature to incorporate into the dough.
Cocoa: dutch process cocoa.

How to make an enriched marble bread
Dough Making
Start by making the tangzhong: combine the flour, water and milk in a small pot and cook over medium heat until thickened into a (loose) paste. Set aside to cool.
Bloom the yeast: in the bowl of a stand mixer mix the yeast with the water and leave for a few minutes. It should start to foam, this is how you know the yeast is good to use.

Combine all the Base Dough ingredients in the bowl: to the yeast add the flour, sugar, eggs, milk powder, and salt.
Affix the dough hook and knead until it starts to come around the hook.


Now add the butter, about half a tablespoon at a time.
As you add, the dough will loosen but left to knead for awhile it will start to come around the dough hook again.
It will be mostly sticky but we’re about to fix that: remove half of the dough and set aside (if you put it in an oiled bowl it wont stick to it). This is going to be the cocoa dough.
With the half that’s still in the mixer, add two more tablespoons of flour and knead until mostly smooth (but still tacky). This is your p. lain dough. Set it in an oiled bowl and leave to rise.

Take the first half you set aside and place it back in the bowl: add the cocoa and a tablespoon of water and knead. If the dough is looking dry, add another tablespoon of water. Once it comes together around the bowl and is tacky, remove it and set into it’s own oiled bowl (the one you used to keep it in briefly is perfect). Cover the dough with plastic wrap.

Rise & Shape
The first rise can be at room temperature until almost doubled, then set in the fridge for at least 30 minutes (to allow for easier rolling/shaping). Alternatively, I make the dough the night before, leave it to rise briefly on the counter (about an hour) then set it in the fridge overnight. It’s usually ready to shape in the morning.

Flour your countertop well: this is a sticky dough. Divide the doughs in half so you have two of each flavor. Roll each out into a long oval/rectangular shape – the width shouldn’t be more than 9 inches, the length can go up to 16 inches.

Layer the doughs: start with a plain, lay a rolled out cocoa dough on top, then a plain dough on top of the cocoa and lastly, a cocoa dough.
Now roll the doughs from the shorter side (so you have a short log), tightly. Set the log in an oiled pullman or large loaf pan (not a standard size).


Tip: if you don’t have a large loaf pan you can split the dough into half, layer just two doughs together and make two smaller loaves.

Let rise until puffy: you’ll know it’s ready to bake when you can poke the dough and it doesn’t bounce back but your finger leaves an indentation.

Preheat the oven to 375 and we’ll bake it for about 10 minutes on this higher temperature. Then lower to 350 F and bake until it’s fully done: you can check this with a thermometer, it’ll take another half hour or so.

Enriched Marble Bread Recipe
Enriched Marble Bread
Ingredients
Tangzong
- 120g or ½ cup whole milk
- 120g or ½ cup water
- 40g or ⅓ cup all purpose flour high protein (or bread flour)
Base Dough
- 60g or ¼ cup water
- 1 package instant yeast or 2 ¼ teaspoons
- ⅓ cup fine granulated sugar
- 512g or 4 cups all purpose flour high protein (or bread flour), when measuring flour shake over the cup then level. Never pack it in.
- 2 large eggs at room temperature
- ¼ cup milk powder or buttermilk powder
- ½ teaspoon fine sea salt
- 57g or ¼ cup unsalted butter softened
Plain Dough
- 2 tablespoons all purpose flour
Cocoa Dough
- 2 tablespoons dutch process cocoa
- 1-2 tablespoons water as needed
Method
- Note: this dough does best when given ample time to rest in the fridge. I like to make mine the night before, leave it for an hour at room temperature, then in the fridge overnight, to shape in the morning.
- Make the tangzhong: set the milk, water and flour in a small pot. Cook over medium heat, stirring frequently, until it comes together in a loose paste, this will take about 3-5 minutes. Take off the heat and set aside.
To make the doughs
- In the bowl of a stand mixer, add the water and instant yeast. Let sit for a few minutes, it should foam (this indicates the yeast is active). Add the flour, sugar, eggs, milk or buttermilk powder, salt and the tangzhong from above. Affix the dough hook and begin kneading on low, working up to a low medium speed. When the dough starts to come together around the dough hook, add the butter in small pats (about a teaspoon at a time). Knead on medium speed until the dough gathers around the hook again, though it will still be quite loose and tacky.
- Remove half of the dough into an oiled bowl (this will be the cocoa dough). To the half in the mixing bowl, add another 2 tablespoons of all purpose/bread flour (this is the plain dough). Knead until it comes together around the dough hook. It should be a lot less sticky now. Transfer it to an oiled bowl and cover for a first rise.
- Return the first half of the dough that was set aside and add the cocoa and start to knead. As it’s kneading add a tablespoon of water, if it still looks like it needs it, add another tablespoon but no more than that. Once it is well mixed, transfer it back to its oiled bowl, cover and leave to rise.
- The first rise can be on the counter at room temperature until both doughs are almost doubled (but not fully doubled). Alternatively, you can make the doughs the night before, leave them at room temperature for about an hour then set them in the fridge overnight. Whichever option you choose, it’s best to have the dough for at least 30 minutes in the fridge before trying to shape the loaf to make it easier to handle.
To shape into the swirl/marble loaf
- On a very well floured countertop, split both doughs in half. Roll each half (for a total of four) into a long rectangle, about 16 inches long and 9 inches wide. Layer the rolled out doughs on top of each other: I start with plain, then chocolate, then plain, and lastly chocolate. Roll the dough up from the shorter side so you have a short log. Set the dough in an oiled pullman loaf pan (or a large loaf pan, I use a 10x5 inch pan). Cover for a second rise. When the dough is quite puffy and has risen about an inch above the rim of the pan, try poking it gently: if it springs back it needs more time to rise. If you leave an indentation that rises back slowly (or barely) the loaf is ready to bake.
- Preheat the oven to 375 F. Set the pan in the oven on the middle rack and bake for 10 minutes. After that 10 minutes, lower the temperature to 350 F and bake for another 30 minutes or so: the bread is done when a thermometer inserted into the center registers 190 F. Let cool briefly then transfer to a cooling rack.
- Store the bread in an airtight container, it’ll be good for a few days. Freeze leftovers!
Did you make this recipe?
Share & tag me on instagram @buttermilkbysam


If I only have a 9×5 loaf pan, might that work? Thank you!
Hi Hannah, you could use that and make some rolls if you like, or use it twice to make two smaller loaves.
I was nervous about making this due to there not being any reviews. I’ve made other recipes from this blog, but it’s like this one is in a forgotten, hidden corner. I am a proficient baker and have had a lot of success with most of your recipes, which are usually extremely detailed and thorough. The recipe itself was much messier than usual. I am in the US but prefer metric measurements for baking, especially bread. The plain loaf was in US standard while parts of the cocoa load were in g. The blog above states that the recipe is enough for 2 loaves, but in the recipe itself there is no instruction for when to divide the doughs in half. I just felt like there was far more guesswork than usual for one of your recipes! I pushed through anyway, as I am using the bread for bread pudding and knew that would allow for some imperfection. In the end, I am very happy with the result. It’s a beautiful, tasty loaf.
Hi Lena, this is a very old recipe when I was first starting to blog and just sharing how I was making things (often with weirdly mixed measurements!). Sometimes I pull recipes like this offline until I can redo them but I haven’t gotten to this one yet. I’m sorry it was frustrating!
Yummy