Black Cocoa Iced Gems
Crispy, smoky black cocoa cookies topped with a crispy vanilla rosette. This recipe is a black spin on the colorful british iced gems.
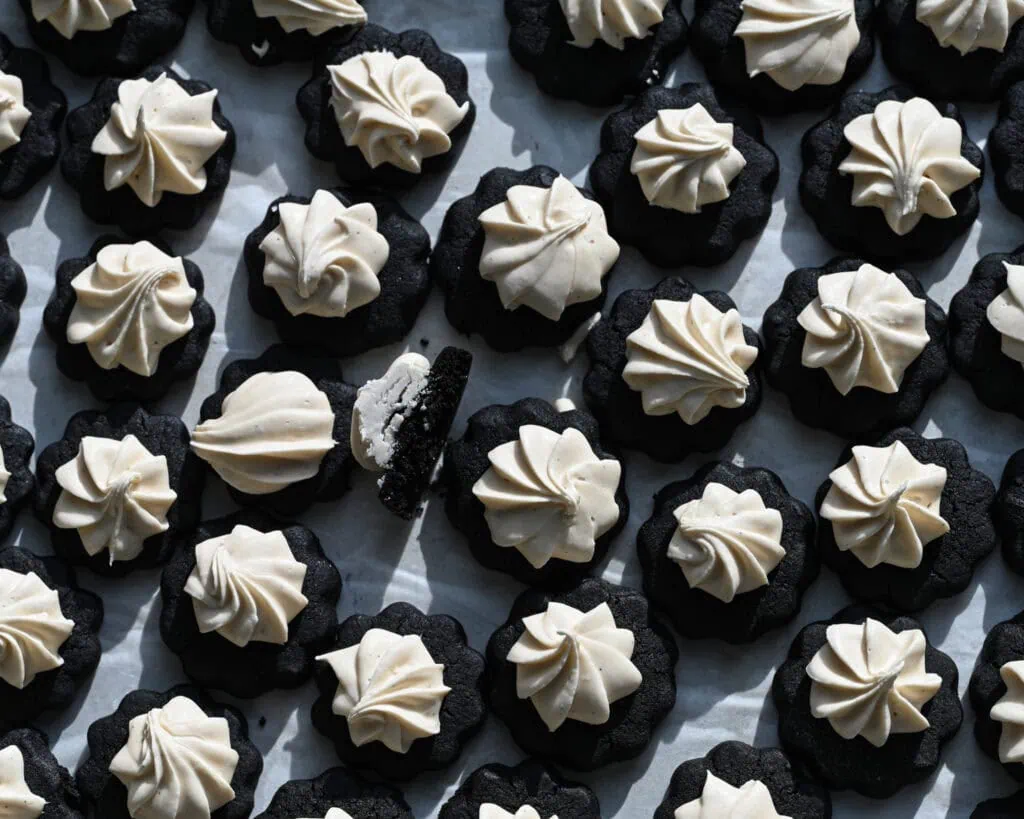
These were inspired by the iced gem cookies featured on the great british bake off, I thought it would be a beautiful contrast of black and white to do this with my black cocoa cookies. But the contrast isn’t just in color: it’s also in flavor and it works so well together here!
I actually grew up getting a cookie very similar to this on road trips in oman. The base was different though, more like a tea biscuit or a sweet oyster cracker. I never really considered trying to make them until I saw that episode of gbbo!

Recipe Ingredients
Black cocoa: heavily alkalized cocoa powder. If you’d like to tone down the black cocoa you can use half black, and half dutch process.
Egg whites: just the whites! This is what will give us a crispy cookie. We’ll also use egg whites for the topping. You’ll have four yolks left, make some pudding!
Sugar: fine granulated sugar.
Salt: fine sea salt. If using table salt, halve the amount.
Butter: unsalted, and at room temperature.
Flour: all purpose flour, medium protein content.
Leavening: we’ll use just a bit of baking soda to help the cookies rise a bit, so they are airy inside.
Vanilla: pure extract. The sweetness of the vanilla helps offset the slightly bitter taste of black cocoa.
Powdered sugar: for the icing on top. Best to use a brand made with tapioca starch.
How to make Black Cocoa Iced Gems
Make the dough
Note: This dough needs at least a few hours to chill in the fridge. I usually make it the night before I plan to bake the cookies.
Use a stand mixer or a hand mixer to mix the dough.
Set the butter in the bowl along with the sugar, salt and vanilla.

Affix the paddle attachment (or use your beaters) to beat the mix together until it’s light and fluffy; this will take around 3-5 minutes (longer if you’re doing it by hand).
Add the egg whites and beat until the mix is well combined, about 30-60 seconds.
Sift in the black cocoa, baking soda and flour and mix until the dough is even and there’s no unmixed flour bits.

Wrap the dough in plastic wrap and roll out into a disk. Set in the fridge to chill for 4 hours or overnight.
Roll the dough out onto a floured countertop until it’s about half inch thickness. Use a one inch cookie cutter to stamp out shapes and place them on a parchment lined cookie sheet. Keep them a bit apart, they do spread a tiny bit and you don’t want them to stick to each other.

Reroll the dough as needed, using flour to help it not stick to the counter (or rolling pin).
Set the trays in the fridge to chill for 10 minutes, until the oven has preheated to 325 F.

Bake the cookies for about ten minutes, until matte all over. Let cool before topping.
Make the topping
Egg whites whip up easier if they are room temperature so take them out earlier if you can.
Add the egg whites to the bowl of a stand mixer (you can also do this with a hand mixer) and affix the whisk attachment. Whisk until frothy, this will take a couple of minutes.
Ensure your powdered sugar is sifted before starting to add it: and add it one spoonful at a time. It’ll probably get stuck on the edges of the bowl so every now and then stop the mixer and scrape down.
Once all the sugar is in and well mixed, add the salt and vanilla. Then mix/beat/whisk until the icing is quite stiff; in the photos you’ll notice mine drooped a bit at the top this is because I stopped whisking a bit too soon.
Transfer the icing to a piping bag fitted with a star piping tip. One by one, pipe a little rosette in the center.
You can leave these to dry in a dry cool area or use the oven, preheat it to 100 F and leave the cookies in there for about 20-30 minutes, until firm.

Baking Iced Gem Tips
Getting the timing right: You want the royal icing to go on cool cookies but you probably don’t want to wait too long between topping. When I make these I start the icing as soon as the cookies come out of the oven. They are small enough that they’ll cool by the time the icing is ready to pipe.
Coloring the topping: british iced gems are traditionally rainbow colored so if you want to give your toppings a bit of color go for it. Add the color when the royal icing is whisking.
Storage: I wouldn’t store these in an airtight container as the goal is to keep them crispy. But a container with just a bit of airflow (eg. a cookie jar) would be great. They should keep well for a week.
Black Cocoa Iced Gems Recipe
Black Cocoa Iced Gems
Ingredients
Black Cocoa Cookie Base
- 226g or 1 cup unsalted butter softened to room temperature
- 200g or 1 cup fine granulated sugar
- 1 teaspoons fine sea salt
- 2 teaspoons vanilla extract
- 2 large egg whites
- 120g or 1 ¼ cups black cocoa powder
- ½ teaspoon baking soda
- 260g or 2 cups all purpose flour
Vanilla Royal Icing Topping
- 2 egg whites from large eggs
- 400g or 3 cups powdered sugar sifted
- ¼ teaspoon fine sea salt
- 2 teaspoons pure vanilla extract
Method
- The dough needs at least a few hours in the fridge, plan accordingly. It can also be left overnight.
- Set the butter, sugar, salt and vanilla in the bowl of a stand mixer (or use a hand mixer) and affix the paddle attachment. Beat until light and airy, for at least a few minutes.
- Add in the egg whites and mix well to combine. Sift in the black cocoa, baking soda, and flour and beat until the dough is smooth and has no visible unmixed flour.
- Wrap the dough into a sheet of plastic wrap and roll into a disk shape. Chill in the fridge for four hours or overnight.
- Prepare two cookie sheets with parchment paper (some butter/grease on the pan will help hold the parchment down).
- Roll out the dough to about half an inch thickness, and use a one inch cookie cutter to cut out shapes. Place the cookies on the prepared sheets, leaving a bit of space between them so they won’t stick together when they bake. Reroll the dough (flouring as needed) to punch out all of it into small cookies.
- Set the trays in the fridge to chill for 10 minutes and preheat the oven to 325 F. Bake the cookies until matte all over, for about 10-12 minutes. Let cool completely.
- Make the icing: set two egg white in the bowl of a stand mixer (you can also use a hand mixer) and use the whisk attachment to whisk until frothy (even at the bottom of the bowl). Add the sifted powdered sugar in spoonfuls, slowly. If some gets caught at the edges of the bowl stop and scrape it down. Once all the sugar is in, add the salt and vanilla. Keep whisking/mixing until the icing is stiff and thick. Transfer to a piping bag fitted with a star shaped piping tip and carefully pipe a rosette on top of each cookie.
- You can leave the cookies on the tray so the topping dries out fully or set them in an oven preheated to 150 F for 20-30 minutes to dry.
Did you make this recipe?
Share & tag me on instagram @buttermilkbysam


