Chocolate Meringues
Crispy chocolate meringues made with just a handful of ingredients. These are light, airy and will melt in your mouth with a light chocolaty flavor.

Years ago I made chocolate meringues for my (then) toddler’s school holiday celebration. One of her teachers came up to me and told me they were just like her grandmother’s cookies and they called them “sleeping cookies” because they were left in the oven overnight. I had never heard that before and thought it adorable and sometimes I use that term myself now.
But my relationship with meringues, specifically fully baked meringues, has not always been easy. Where I can whip up an italian or swiss meringue topping in my sleep (;p) I struggled with the french style and if they weren’t teeny mini meringues, I always seemed to mess up the baking temperature and time.
I made these like 6-7 times this past season and am quite confident now that this specific recipe and formulation will work. I’m going to give you some tips in case your oven behaves a bit differently as I find temperature differences can be a culprit.
Recipe Origins
This is a standard meringue recipe that uses a quarter cup of sugar for every egg white added, you’ve seen it in this swiss meringue recipe, and these mini chocolate pavlovas. It is nearly identical to the former without the addition of the cornstarch and vinegar as we are aiming for a crispy meringue texture with a fully dry interior rather than a marshmallowy center. I also increased the cocoa slightly.
It also differs in technique: this is French style with the added step of warming the sugar, which I learned from Ottolenghi. I’ve found that the heat helps dissolve the sugar quicker and offers that extra reassurance that the meringues will bake well – the same reason I’ve started adding cream of tartar to my meringue bases.

Recipe Ingredients
Egg whites from large eggs: there should be absolutely no egg yolk/yellow mixed into your egg whites or they will not whip (fat acts as an inhibitor).
Cream of tartar: this helps stabilize the whipping egg whites.
Sugar: fine granulated sugar.
Vanilla: pure vanilla extract but if you have it vanilla bean paste is preferable as it has less water.
Salt: fine sea salt.
Cocoa: I use dutch cocoa powder though natural could work too (it will have less flavor though).

How to make Chocolate Meringues
Separate the eggs: it’s really, really important to not have any yellow egg yolk in the whites. If you do get any in there, you’ll need to start over. Reserve the yolks for another use.
Warm the sugar: preheat the oven to 225 F and place the sugar on a small metal baking pan, like a pie pan or a small cookie sheet. Set the sugar in the oven while it is preheating; this is going to warm the sugar so it dissolves quicker into the egg whites. Once the oven has preheated, take the sugar out.
Whisk the egg whites until frothy/soft peaks: set the egg whites in a stand mixer bowl and affix the whisk attachment. Start whisking on low and gradually move up to a medium low speed. As it whisks, add the cream of tartar. We are looking for soft peaks and for all of the liquid to be foamy (there should be no pale egg white that has not been ‘frothed’):

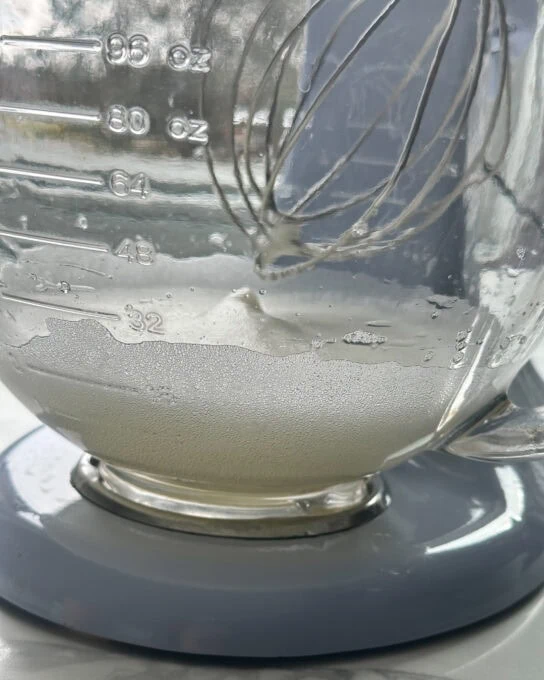

Slowly pour in the sugar: only start adding the warm sugar when all of the egg whites are frothy; they shouldn’t just be frothy on top. Check the liquid (a glass bowl is useful here) by swirling it around to ensure that it’s all at that frothy stage and there’s no pale liquid.
Adding the Sugar & Stiff Peaks
Once you have confirmed it’s frothy enough, slowly pour in the sugar: roughly a tablespoon at a time, letting the mixer go around a few times before adding another. Keep going until all the sugar is in.
Once all the sugar is in, I stop the machine and use a large rubber spatula to scrape the sides as this is where some sugar granules will get stuck and not incorporate into the meringue if left there.
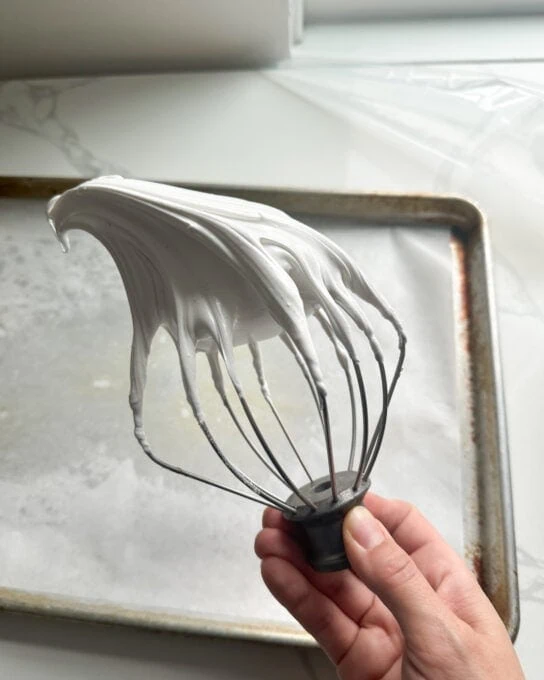
Whisk until stiff peaks: the age old trick is, turn the mixer off and take out the whisk attachment. If you can hold it upside down and the meringue holds its shape and does not droop, it’s done whisking. You’ll check this a few times, when it is getting close…
Add the vanilla and salt: toward the end of whisking.

Add the cocoa: once you have stiff peaks, add in sifted cocoa and briefly turn the whisk on for only 20 seconds or so to mix it in. If it still hasn’t gotten fully mixed, switch to a rubber spatula and fold the cocoa into the meringue making large J shapes.

Prep the cookie sheets: the oven should still be at 225 F. Line a cookie sheet with parchment paper (a little grease on the pan helps it hold shape).
Bake the Meringues
Dollop onto cookie sheets: I use a 2-2.5 disher/cookie scoop to portion the meringue. It gets sticky after a while and the meringue refuses to come out so I clean it and start over. You don’t need to leave too much space between the meringues but about a half inch diameter should be ok.

Bake until firm and dry: for 1 hour and 30 minutes. Don’t open the oven during this time, unless your oven tends to run hot and you need to check on them a bit early. To check for doneness: the meringues should be dry to touch, hard, and lift easily from the parchment paper.
Leave the meringues in the oven to cool for a few more hours, or overnight. I like my meringues a little warm and melty in the center so I tend to have them not so long after cooling =)
Tips for making meringue cookies
Separate eggs while cold and start whisking the egg whites at room temperature. This is mainly for ease as eggs separate more easily when cold and room temperature egg whites will whip easier and quicker.
Avoid humid days: very occasionally I’ll attempt meringues on a humid rainy day and they will fail.
Clean your bowl and all utensils of any grease/oil: also your hands should be clean and dry when separating the eggs. Any oil can inhibit meringue formation.
Scrape the bowl once the sugar is in: when we’re adding sugar slowly into the pan some of it will fly to the sides of the bowl and the whisk won’t quite get to it. Use a large rubber spatula to scrape those edges and force the meringue down into the path of the whisk so that it all incorporates evenly.
Don’t overwhip the cocoa: once the cocoa is in, stop mixing immediately. We don’t want to deflate the meringue.

FAQ
Can I make meringues with a hand mixer?
In my experience this is very difficult unless you are making a smaller amount (eg. two egg whites and 100g sugar) as it takes quite a lot of time and patience. Stand mixers are much more suited to the job.
How to store chocolate meringues?
Store them in an airtight container, at room temperature. But only do this once they have completely dried and cooled!
How long do they last?
As long as they are kept secure (see above) the meringues should be ok to eat for about a week, though I think they taste best within the first 3-4 days of baking.
Can I pipe the meringue onto the pan to make cute shapes?
Yup, just fill the piping bag carefully and gently to avoid squeezing out too much air.
Topping & Swirl Ideas
If you like you can add chopped nuts to the meringues. For swirling/topping: warm some peanut butter or pistachio cream, or even melt some chocolate and swirl it into the top (no more than half a teaspoon per cookie) before baking.
Chocolate Meringues Recipe
Chocolate Meringues

Ingredients
- 4 egg whites from large eggs (each egg white should weigh approx.
- ¼ teaspoon cream of tartar
- 200g or 1 cup fine granulated sugar not organic, must be *fine*
- 2 teaspoons pure vanilla extract
- ½ teaspoon fine sea salt
- 2 tablespoons dutch process cocoa sifted
Method
- Do ahead: Separate your eggs: there should be absolutely no yellow or egg yolk in the egg whites that are to be whipped. The yolks can be reserved for another use. Let the egg whites come to room temperature; 10-20 minutes on the counter should do it. Use clean utensils, bowls, and hands - as grease or any kind of fat will prohibit meringue formation.
- Set the sugar on a metal pie pan or a small cookie sheet and set it in the middle rack of the oven, turn the oven on to preheat to 225 F. The goal is to just warm the sugar slightly. Once the oven has preheated, take the sugar out.
- While the oven is preheating, set the egg whites in the bowl of a stand mixer and affix the whisk attachment. Begin whisking on low and turn it to medium low speed, adding the cream of tartar as it whisks. Whisk until the whites are completely frothy (even at the bottom) and have reached soft peaks. The bubbles should be quite small and there should be no pale yellow liquid.
- With the mixer on medium low speed, add the sugar about a tablespoon at a time allowing the mixer to run at least 10 seconds between each addition. Once all the sugar is in, stop the mixer and scrape the sides to catch any sugar granules that are not getting mixed into the meringue.
- Whisk until you reach stiff peaks adding the salt and vanilla toward the end: this is going to take awhile, about 10 minutes but don’t go by timing - you’re looking for a meringue that is thick, glossy and holds its shape. When the whisk is lifted the meringue should not droop. Once you have stiff peaks, add in the sifted cocoa and turn the mixer on just to mix it in (no more than 20 seconds). If it still hasn’t mixed, use a clean rubber spatula to fold the rest in: carefully making large J shapes.
- Prepare a cookie sheet with parchment paper (a little grease on the pan helps hold the paper down) and use a cookie scoop - I use this disher - that holds about 2-2.5 tablespoons of meringue to dollop the meringue onto the pan. Leave just a little space around them, they do puff a bit but they won’t spread.
- Set in the oven to bake (it should still be at 225 F) until the meringues are dry to touch and lift easily from the parchment, for one and a half hours then shut off the oven and let the meringues cool for at least 4 hours or overnight in the oven. They’re ready to eat as soon as they are completely cool. Store in an airtight container.
Did you make this recipe?
Share & tag me on instagram @buttermilkbysam


I noticed on the recipe you say that each egg white should weigh something – how much should it weigh?
how much should each egg white weigh ?
around 30g