How to caramelize white chocolate
Turn sweet white chocolate into toasty caramel flavored chocolate by using this visual guide for how to caramelize white chocolate.

You may have heard of a chocolate called dulcey or caramelized white chocolate: this is a technique invented by Valrhona, the famous chocolatiers. Caramelizing results in a toasty, kind of nutty and you guessed it ‘caramel’ like taste. Below I show you step by step photos for how to make caramelized white chocolate at home.
Overview: how to caramelize white chocolate
One of the easiest and most delicious things you can make with just an oven, a spatula and a baking try: use good quality white chocolate and toast it on low heat and for about 40-50 minutes, stirring every 15 minutes as it caramelizes on the bottom. This process removes some of the cloying sweetness, and adds notes of butterscotch to the taste.
The first step is to buy the right chocolate: you want a high quality, eating chocolate (not a baking bar). Check the ingredients and look for a high percentage of cocoa butter. Some brands known for being good quality: Green & Black, Callebaut, Guittard white chocolate chips and of course, Valrhona. I usually use lindt white chocolate bars.
Step by Step: A Visual Guide for how to Caramelize White Chocolate

How to Caramelize White Chocolate

Ingredients
- 4x 125g white chocolate bars for a total of 500g but you can do half this amount if you prefer
Method
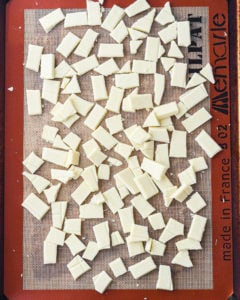
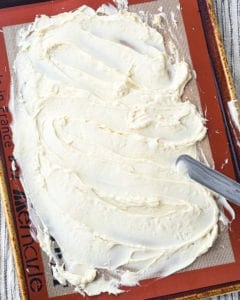
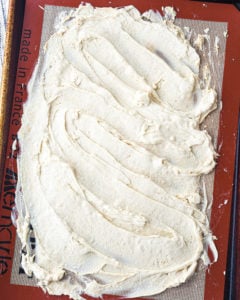
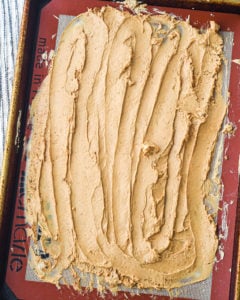
- Preheat the oven to 250 F. Break up the pieces of chocolate and spread them onto a pan. I use a silpat mat if I’m caramelizing a small quantity because it makes scraping and stirring easier without the chocolate sticking to the pan. If it’s a larger batch, I use a 13 x 9″ baking pan that hasn’t been too tarnished (no parchment paper or anything).
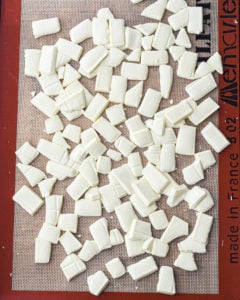
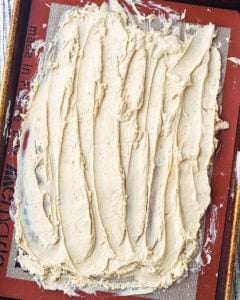
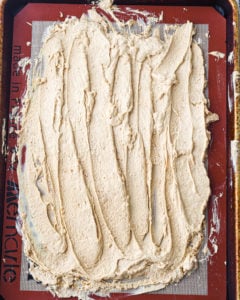
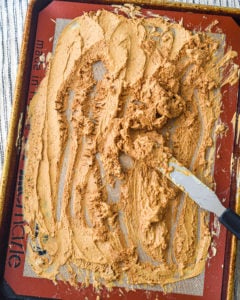
- The chocolate will be in the oven for a total of 40-45 minutes, at every ten minute mark, take it out and 'turn' it: using a rubber spatula smooth the chocolate over several times (shown in the video) so that it browns evenly.
- After 40 minutes in the oven, the chocolate will have taken on a golden, light brown color. Scrape it off the pan best you can into a food processor.
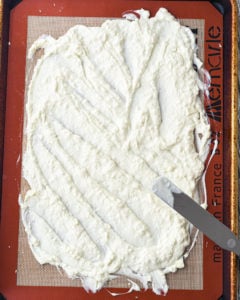
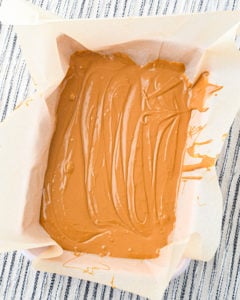
- Process the chocolate on high for about 2 minutes, scraping down the processor bowl as needed so it blends evenly.
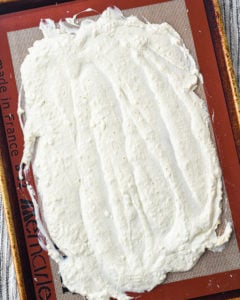
- Pour the chocolate into a parchment lined baking pan, scraping out as much chocolate as possible from the processor bowl. Smooth into an even layer and set in the freezer.
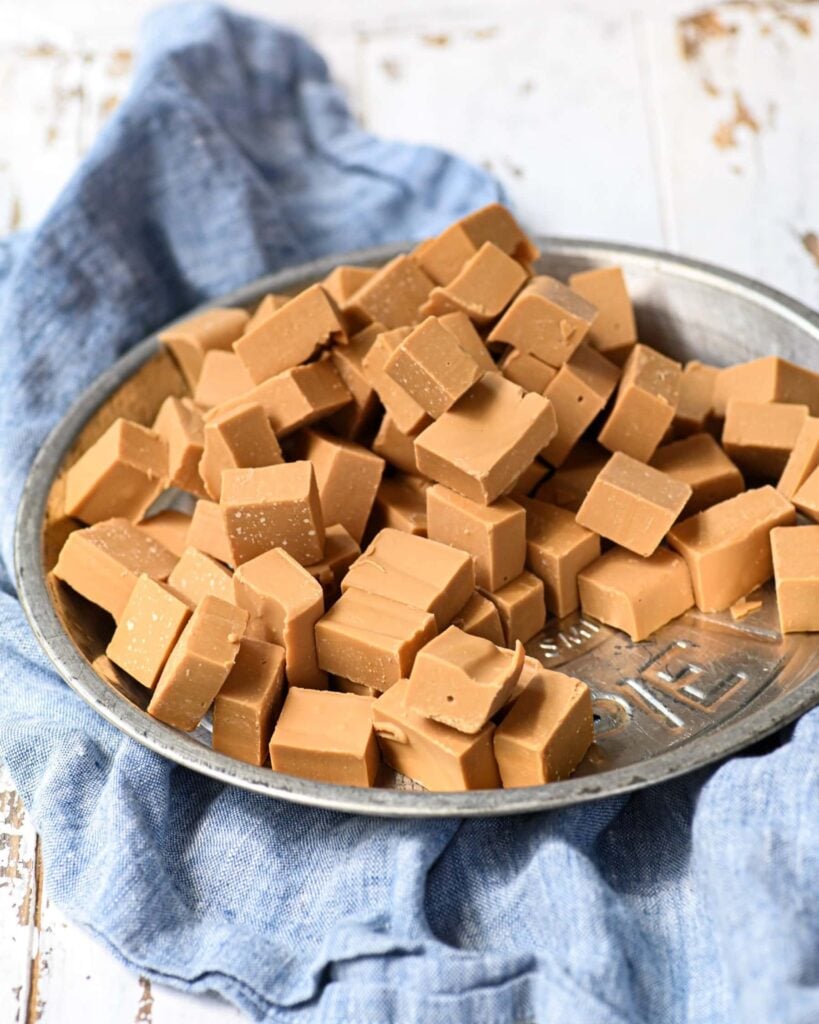
- After a few hours, the chocolate should be firm and solid. Chop it up with a chef's knife and transfer to an airtight container. Store the chocolate in the freezer.
Notes
Did you make this recipe?
Share & tag me on instagram @buttermilkbysam


Thank you so much for this recipe. I just want to throw it out there that I used some expired Ghirardelli white chocolate chips just to give the recipe a go and it actually worked really well. The chips went crumbly fairly quickly and never really got to a stage of being able to smooth them out, but once I felt the color was good, I dumped them in the food processor. The taste is really deep and caramelly, as it should be, and it saved me from having to toss the chocolate.
this caramel white chocolate was amazing, i then whipped it to use as a whipped ganauche for a biscoff yule log.
I don’t usually like white chocolate, but when I found a bunch of Lindt bars on sale for half off, I just had to buy and caramelize them all! Let me tell you, this stuff is the real deal. Instead of being cloyingly sweet, it has this delicious caramel-y flavor that isn’t overpoweringly sweet. Mine took exactly 40 minutes to turn and about 2-3 hours in the freezer to harden. I can’t wait to make all sorts of delicious things with it!
ISN’T IT GREAT. I’m so happy to have converted another :p
great ????????
I have a Vitamix and food processor – do you recommend one over the other? Thank you!!
Oooh, I’ve only ever used a food processor for this. A vitamix could work! I’d use whatever is easier to clean (the chocolate is sticky and messy!).
If using a couverture chocolate, do you temper as usual after set and hardened? Thanks!
that’s how I’d do it yep, and I’d temper by adding some un-toasted white chocolate (it dilutes the caramelized taste just a bit).
looks amazing.
I got so scared when I pulled the chocolate out of the oven the final time! It was suddenly brown and dry like Graham cracker crumbs and I thought for sure I had messed it up. I took a breath and popped it into the food processor anyways and it was like magic! It turned into this silky smooth goodness. ? I’m turning it into cookies today and I’m so excited!
Thank you so much for your guide, Sam! I found the photos very helpful when I attempted this months ago. However, checking in now, it looks like the rest of the article and photos are missing. I can only see the two paragraph overview. Any chance it’ll be re-uploaded soon?
I was really excited to try this out, but sadly it just didn’t pan out for me. First, it took nearly 3 hours to get to the golden brown caramel color for me, even though my thermometer stayed right around 250 and I used the Lindt Classic White Chocolate bars you mentioned (3 total), on a silpat. It started getting color around 50 minutes in but it was slooooooow going. The end result was a beautiful color and very smooth but honestly tasted identical to the regular melted white chocolate in a comparison taste test :/ I’ll probably dip some shortbreads in it since it does have a pretty look and anyone who likes white chocolate would appreciate it.
How long does this keep? Also in another recipe for rye ccc I saw you tempered the chocolate. Can I temper as well and then store for a month or so?
You can temper if you like (follow the instructions on the rye cookie page). Either way it’ll keep fine for a month.